Camera Mastery
In one of our Core classes Light, Sound, and Time we addressed how we perceive light and how it acts in correspondence to different scenarios and materials. After discussing the different properties of light it was time to put them to the test. Our project for this unit entailed the crafting and testing out of our own pinhole cameras. The process was split up into a couple of parts, building, taking the photos, and developing. The first thing was to construct our cameras.
My measurements:
distance from your lens to your photo paper
8.5 inches
height of your pinhole
2 inches
height of your subject
1 ¾ inch
Minimum distance your camera has to be away from your subject
15.93 inches
Measurements in correspondence to the similar triangles:
H1=2
H2=3.75
W1=8.5
W2=15.93
C1=8.73
C2=16.36
Our cameras demonstrate that light = energy and that that energy can be captured and manipulated through the lens of the camera and onto the photosensitive paper. Now that we have all of the measurements ready, we can set the photosensitive paper into the box, close the flap, and bring it outside to capture the photo. It has to be set outside for five minutes for the paper to fully react to the light around it. The image on top below was my second try and the one on the bottom was my first.
I am proud of how well I was able to put together the camera, I think I did a full and thorough job of designing and painting it over. I would have more time to study those things I couldn't quite understand the first time it was taught. All teachings to do with the unit circle had not clicked with me I feel until the very end of the lesson.
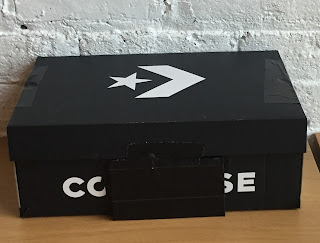
Camera final product DN (2022)
Our cameras are made out of cardboard boxes, duct tape, a metal can, and black paint. We came to class with our materials and got to work. The objective was to make a camera that would ideally let no light in except through the pinhole. What we first did is tape all seams of the box and then paint the inside of the box completely black. This was an important part of the process because white would make the light that is directed through the pinhole bounce off the walls of the camera, which would not give a clear final image.
At the front of the camera we cut a small circle out of the box and a small rectangle out of the can. The can is then poked with a pin to create a small hole to direct the light through. The hole has to be sanded down because the extra extruding metal could block some rays of light needed to develop the photo. Adding a flap made out of a piece of extra cardboard attached to the box will block out any unwanted light coming from the hole when not taking a picture.
The way that the camera captures an image is that it flips it upside down. This is neither an example of reflection nor refraction. Refraction means the bending of light through the change into another medium, and reflection means the change in direction of light making it appear somewhere else. It took a while but once all was assembled it was then time to bring in an object to photograph. I thought of a dog figure I had in my room and decided to use it for my first photo.
Dog Figure DN (2022)
Before we could press forward anymore we had to find the height and distance of our camera and the object had to be put apart from each other to get a clear shot. All measurements can be seen below.
My measurements:
distance from your lens to your photo paper
8.5 inches
height of your pinhole
2 inches
height of your subject
1 ¾ inch
Minimum distance your camera has to be away from your subject
15.93 inches
Measurements in correspondence to the similar triangles:
H1=2
H2=3.75
W1=8.5
W2=15.93
C1=8.73
C2=16.36
Similar Triangles diagram DN (2022)
Photo outcomes DN (2022)
I´m not completely sure why the first one came out the way it did but if you look closely in the top right you can see the books I placed underneath the dog to get a clear shot. My angle was possibly off but what I think is that I set my camera right next to the door both times and people opening and closing the door could've caused glare that made crazy blobs of light seep through. the second one turned out the way it did I think because it had fallen over multiple times which messed the process up and made the paper stay black.
I am proud of how well I was able to put together the camera, I think I did a full and thorough job of designing and painting it over. I would have more time to study those things I couldn't quite understand the first time it was taught. All teachings to do with the unit circle had not clicked with me I feel until the very end of the lesson.


Comments
Post a Comment